Buyer Settings
How to enable Buyer level settings?
Event Admin can get maximum information from the buyer when they fill the Registration Form by adding (enabling) fields from the Attendee Settings tab. All relevant basic information of the ticket buyer can be fetched easily by customizing the Buyer Settings, to do this please follow the given instructions:
Step 1. Eventdex Portal >> Login by entering your credentials >> Click on the Your Event
Step 2. Click on Eventdex >> Event Settings >> Attendee Settings >> Buyer Settings
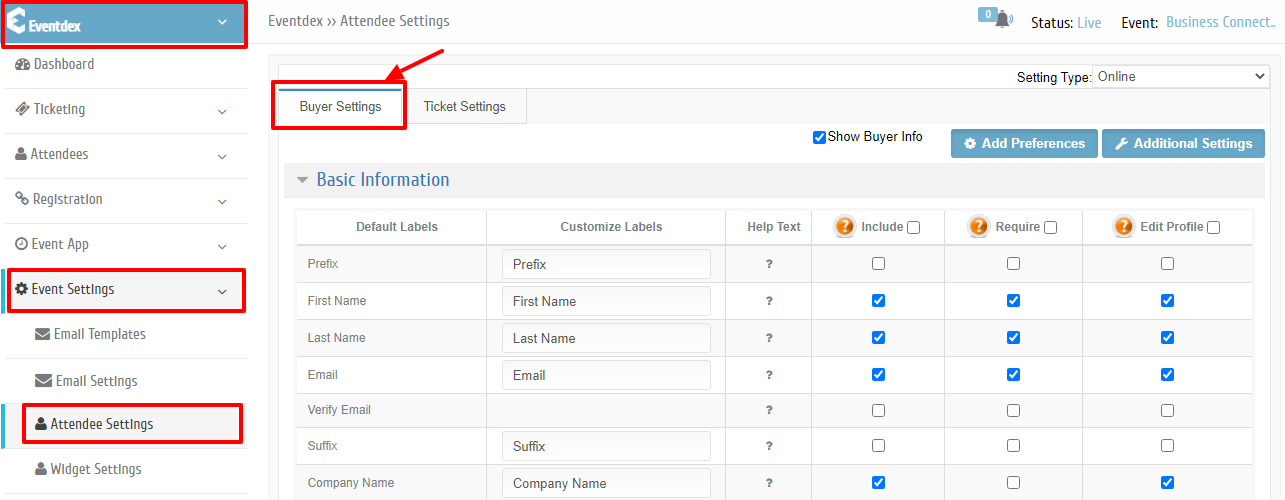
Step 3. “Buyer Settings” screen appears.
From here – “Basic Information” section, Buyer level settings can be enabled for the Registration Form.
You can customize the Registration Page by making changes in the following settings:
Customize Labels: Give your preferred choice of Titles/Labels to the Default Labels.
Help Text: provides help text to labels
Include Fields : Enable (“Check” mark) the boxes of respective labels to include them on the Registration Page (Not Mandatory field for Buyers).
Require Fields : Enable the boxes to make the respective labels as mandatory fields for the buyer to be filled during the registration process.
Edit Profile : Enabling the labels allows buyer to edit their profile even after the registration process is completed and their ticket is confirmed.
Step 4. Click on “Save” tab to confirm the entries or click on “Cancel” to exit the page.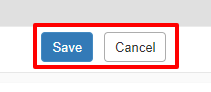
How to setup Additional Information Tabs on the Registration Page?
Event Admin can easily fetch more information from the ticket buyer by adding more categories or Additional settings on the Registration Page. To do this please follow the given steps.
Step 1. Eventdex Portal >> Login by entering your credentials >> Click on the Your Event
Step 2. Click on Eventdex >> Event Settings >> Attendee Settings >> Buyer Settings
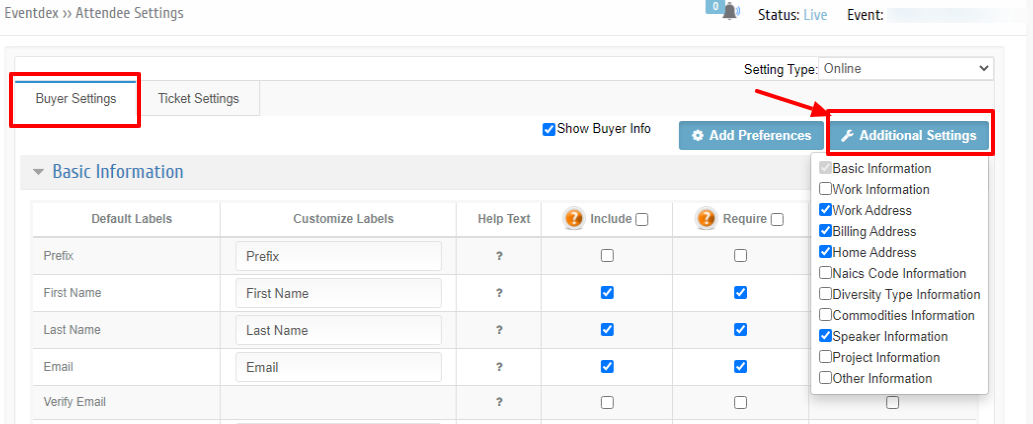
Step 3. Click on “Additional Settings” tab and select the preferred settings from its drop-down menu.
Step 4. The selected “Additional Settings” categories will be displayed on the screen. You have to enable the label on the Registration page by clicking “Check” mark on the desired fields: Include Fields, Require Fields, Edit Profile.
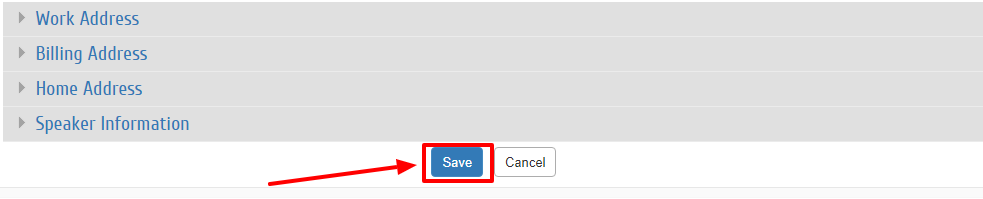
Step 5. Click on “Save” tab to confirm the entries or click on “Cancel” to exit the page.
Ticket Settings
How to enable Ticket Level Settings?
If a Buyer wants to purchase more than one ticket then Attendee level Settings are helpful for collecting different attendees’ information from the Registration Page. Event Admin can include multiple types of Tickets for an event on the Registration page. To do this, please follow the given instructions:
Step 1. Eventdex Portal >> Login by entering your credentials >> Click on the Your Event
Step 2. Click on Eventdex >> Event Settings >> Attendee Settings >> Ticket Settings
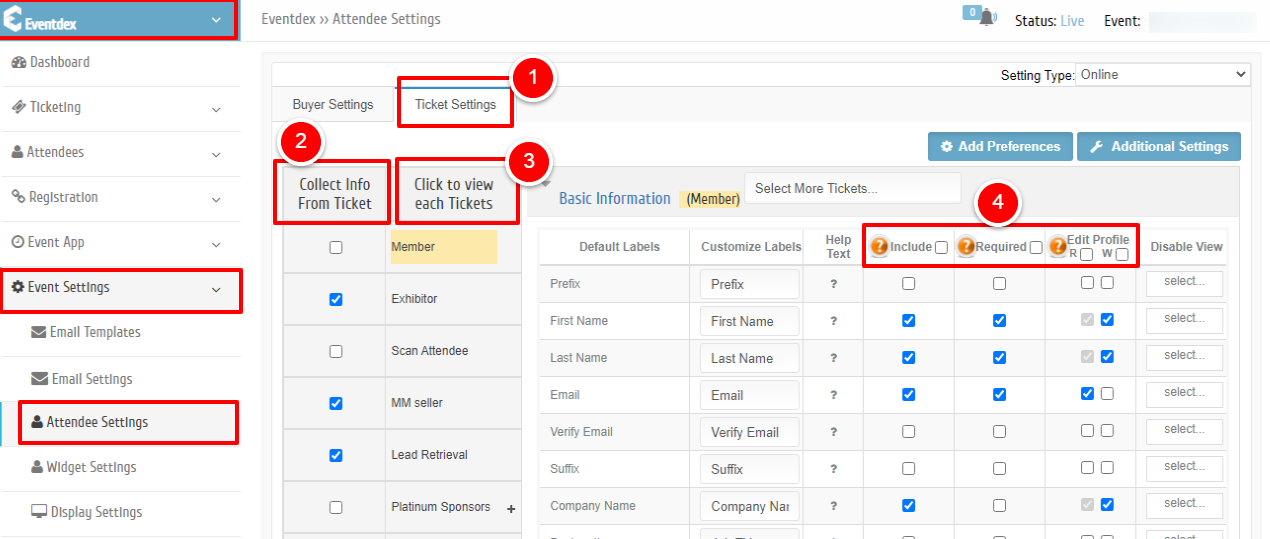
Step 3. Click on “Ticket Settings” tab.
Step 4. Click “Check” mark on the “Collect Info From Ticket” column for enabling desired Ticket type.
Step 5. From the “Basic Information” section Attendee level settings are enabled for the Registration Form. You can customize the Registration Page by making changes in the following settings:
Customize Labels: Give your preferred choice of Titles/Labels to the Default Labels.
Include Fields : Enable (“Check” mark) the boxes of respective labels to include them on the Registration Page.
Require Fields : Enable the boxes to make the respective labels as Mandatory fields for the attendees to be filled during the registration process.
Edit Profile :
(i)”R” – Read-only option for attendees after ticket order confirmation. (Non-editable registration data for attendees after confirmation)
(ii)”W” – Write option for attendees after ticket order confirmation. (Attendees can edit their registered data even after tickets are booked & confirmed)
Step 6. Click on “Save” tab to confirm the entries or “Cancel” to exit the page.
For every ticket type, you have to select the particular ticket, enable the required labels and save the entries to confirm it. In this way, you can include customized ticket settings on the Registration Form.
How to keep same Ticket settings for Multiple Types of Tickets, at a time?
Many times, Event Admins wants to keep the same type of Ticket Settings for multiple types of Tickets. This can be done at a time and that saves a lot of time and manual efforts. To do this, follow the below-given steps:
Step 1. Eventdex Portal >> Login by entering your credentials >> Click on the Your Event
Step 2. Click on Eventdex >> Event Settings >> Attendee Settings.
Step 3. Click on “Ticket Settings” tab.
Step 4. Click on “Basic Information” box and select the ticket types from its drop-down menu.
Step 5. Enter preferred details in “Customize Labels” column and enable the desired fields: Include Fields, Require Fields, Edit Profile (R/W).
Step 6. Click on “Save” tab to confirm the entries or “Cancel” to exit the page.
How to setup Additional Information Tabs for Attendee level settings on the Registration Page?
Event Admin can easily fetch more information of the attendees by adding more categories or Additional settings on the Registration Page from Ticket Settings. To do this please follow the given steps.
Step 1. Eventdex Portal >> Login by entering your credentials >> Click on the Your Event
Step 2. Click on Eventdex >> Event Settings >> Attendee Settings >> Ticket Settings.
Step 3. Click on “Ticket Settings” tab.
Step 4. Click “Check” mark on the “Collect Info From Ticket” column for enabling desired Ticket type.
Step 5. From the “Basic Information” section Attendee level settings are enabled for the Registration Form. You can customize the Registration Page by making changes in the following settings:
Customize Labels: Give your preferred choice of Titles/Labels to the Default Labels.
Include Fields : Enable (“Check” mark) the boxes of respective labels to include them on the Registration Page.
Require Fields : Enable the boxes to make the respective labels as Mandatory fields for the attendees to be filled during the registration process.
Edit Profile :
(i)”R” – Read-only option for attendees after ticket order confirmation. (Non-editable registration data for attendees after confirmation)
(ii) “W” – Write option for attendees after ticket order confirmation. (Attendees can edit their registered data even after tickets are booked & confirmed)
Step 6. Click on “Save” tab to confirm the entries or “Cancel” to exit the page.
For every ticket type, you have to select the particular ticket, enable the required labels and save the entries to confirm it. In this way, you can include customized ticket settings on the Registration Form.